
Compass
The Micro:Bit has a built-in compass that we are going to use right now!
You will learn:
• How to understand the degrees on a compass.
• How to use the compass of the Micro:Bit.

Log in before starting the exercise.

ORIENTATION
Take a look at the example and consider the following questions:
- What should I do?
- What are the goals?
- What are the expectations?
- What can I already do?
- What do I still have to discover?

PREPARATION
View the steps under 'perform'. Then answer the following questions:
- Which steps should I follow?
- Which steps can I follow?
- How much time do I need?
- What tools do I need?

Perform
Do the steps one by one. Do you not remember how to do it? View the hints or download the solution.
STEP 1
STEP 2
Arrow with direction
We now want to introduce an arrow that indicates the direction on the compass. An arrow is easier to read than the amount of degrees.
Like we said earlier, there are a few built-in images in Micro:Bit. There are also a few built-in arrows which you can find in ‘basic’.

When does an arrow need to point up? You need to pick out a field of degrees in order to do that. The figure mentioned below may help you.
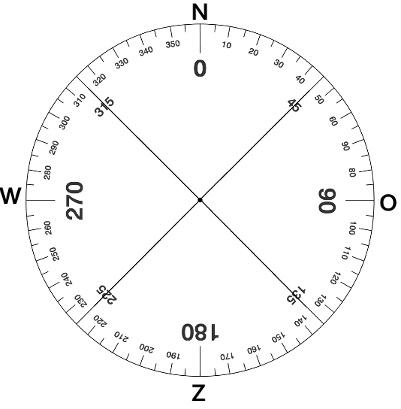
Start by using a variable that you equate with the degrees. Make sure to use
an “if...then...else” block in combination with a smaller “then”block. (Logic)
STEP 3
STEP 4
STEP 5

REFLECT
Look back at the project you just made. Ask yourself the following questions:
- Does the program work as I expected? Why / why not?
- What works well?
- What works less well?
- How can I approach it differently?
Download
Click the link below to download a sample solution.