
First micro:bit programme
We’re getting to know the micro:bit with the Microsoft Block Editor. Dragging and stacking blocks is already familiar to us thanks to Scratch. The blocks are named a bit differently, but you’ll quickly get the hang of it.
You’ll be learning:
• About the parts of your micro:bit.
• How to program your micro:bit.
• How to install programmes on your micro:bit.
• How to control the LED lights on your micro:bit.
• How to pause a programme.
• How to use the buttons on your micro:bit as input for your programme.
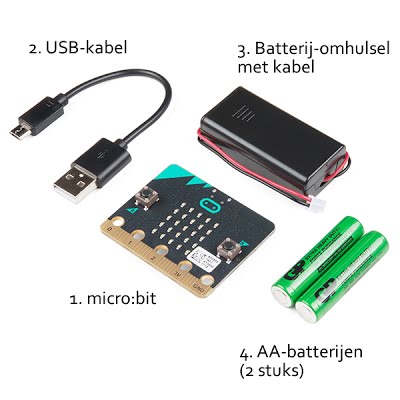
When you open the micro:bit’s packaging, you’ll notice several parts. We’ll go over them.
1. The first part is the micro:bit itself.
2. The USB cable is the connection between your micro:bit and your computer. This way you can install programmes on your micro:bit.
3. If you connect the batteries with the micro:bit, it can work independently.
4. Of course, the little black box should contain two functioning batteries.
Your micro:bit consists of several components.
For example, your micro:bit has a compass! The different components are explained on the back of your micro:bit.
That’s also where you can see where to insert the batteries or plug in the USB cable.
You’ll also notice a “RESET”-button, which can reset the programme.

We’ll start by switching on the Micro:Bit. To do this, connect the battery or the USB cable to the micro:bit.
Installing a programme on your micro:bit
You can recognise a programme for the micro:bit by its suffix “.hex”.
Installing a programme on your micro:bit is just as easy as putting a file on a USB drive. If you correctly plug in the USB cable, the drive “MICROBIT” will appear on your computer. You just have to drag the programme to this drive.
The default programme
Next, we’re going to explain what the default programme on the micro:bit does. This will give you an idea of the possibilities. The moment you plug in the micro:bit, the LED lights will switch on.
1. You’ll have to press button A and B. We’ll be able to use these buttons when we’re writing a programme.
2. Now you’re asked to shake your micro:bit. The micro:bit has an accelerometre which can detect when you’re moving the micro:bit.
3. Next, you’re asked to move the micro:bit as soon as a dot begins to move. You’re supposed to catch the flashing dot.
4. This programme will be started every time you switch on the micro:bit. That is, until we install our own programme...

There is a hidden game in the programme. At the end, a little heart will temporarily appear. If you press both the A and the B button at exactly the same time, a game of Snake will start.
The first bit of code
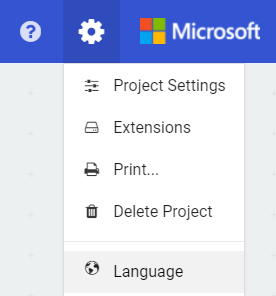
FIRST OPEN THE BLOCK EDITOR.
If the language isn’t English, you can change it by clicking the gear and choosing “English” under “Language”.
There are several groups of blocks, which all have a specific colour, just like in Scratch. To use them, drag them to the work field on the right. You can delete a code by dragging a block back, just like you do in Scratch.
On the micro:bit at the left, you can immediately see your code’s reaction. To download the code, press the button ‘Download’ at the bottom on the left.
You can use the 25 LED lights to form symbols and figures. Letters, too. And many letters create a word! Can you write your name on your micro:bit from the moment it’s switched on?